CIMA Registration Instructions
Overview
If you have installed an application from the MaaS360 App Catalog or Intune Company Portal that asks for a NASA Derived Credential Registration Code follow the steps below.
Prior to beginning the registration process please ensure you are in compliance with the below items.
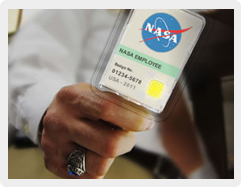
- A computer that has a PIV badge reader.
- Your Smartcard (PIV Badge).
- Your Smartcard (PIV Badge) PIN. If you have forgotten your PIN, see Launchpad FAQ
- The iOS or Android device that you wish to register.
- A CIMA enterprise app (such as WebTADS Mobile) from MaaS360 or Intune installed on the device you are registering.
Step 1: Insert Your PIV Badge In To Your Computer Card Reader
To register your mobile device, you must login through Launchpad using your NASA PIV badge. Before going forward, make sure your PIV badge is inserted into the badge reader of the computer you are currently using. If the computer you are using does not have a badge reader, you must use a computer that does in order to continue the registration process. Mac machines are currently not supported for PIV badge login.
You can only register your mobile device(s) from a computer that has a PIV badge reader.
Step 2: Go To My CIMA Registrations
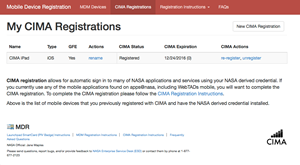
With your PIV badge inserted into the computer card reader, open an Internet browser session and navigate to My CIMA Registrations. With the use of your PIV badge you will automatically be authenticated via Launchpad into the site. If you are directed to the Launchpad login page instead of being automatically authenticated please ensure the PIV badge is properly inserted into the card reader.
Step 3: Initiate Device Registration
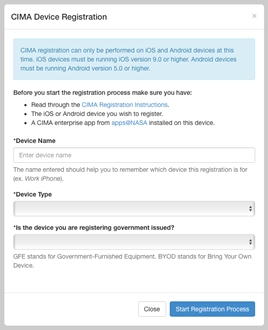
From the My CIMA Registrations page, click the New CIMA Registration button. Once a new dialog box appears enter the chosen name of the mobile device that is being registered. Please note this name is required only to assist the user in identifying the mobile device they are registering. The name does not need to correspond to the specific model of the phone. For example, you may choose to enter a name such as Work iPhone. Next, select the type of device being registered. Lastly, select if the device is a government supplied (GFE) or is user owned (BYOD).
Step 4: Create Registration Code
Once you have entered your device name, click the Start Registration Process button. This will create a registration code that must be entered from the device being registered.
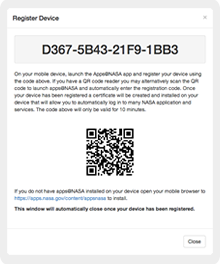
IMPORTANT: The registration code will be displayed in a dialog box. Please ensure you have written down the code or successfully entered the code from the device registration screen (Step 5). Once the dialog box is closed it will no longer be available.
Step 5: Enter Registration Code
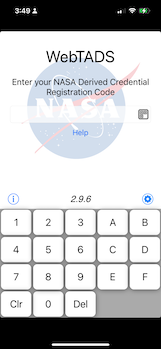
To enter the registration code displayed on the dialog, open a CIMA enterprise app (such as WebTADS mobile) on your mobile device. From the "Enter yor NASA Derived Credential Registration Code" screen, enter the registration displayed within the dialog box. The QR code scanner on the login screen can also be used to scan the QR code from the previous dialog. This will insert the registration code automatically.
Once the registration is entered, select done and the registration code will be verified. Upon successful verification, the device will be enrolled, and you can secure the credential with a 6 digit PIN and use your CIMA derived credential to login to NASA applications.
Step 6: Logging In With CIMA Derived Credential
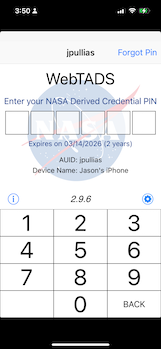
Once you've successfully registered your device you can log in to many NASA applications using the PIN you entered to secure your CIMA derived credential.